| | Plug - Body Part |  |
|
+7honda_silver KurtPerthWA Cosmic_Jumper jdeereanton DennisB Waspie MikeO 11 posters |
| Author | Message |
|---|
MikeO
Site Admin

Number of posts : 3788
Age : 74
Location : Seaham, Co Durham, UK
Points : 9440
Registration date : 2009-06-29
 |  Subject: Plug - Body Part Subject: Plug - Body Part  Tue Mar 16, 2010 4:11 pm Tue Mar 16, 2010 4:11 pm | |
| Does anyone happen to know if the little square plug in the panel just below the handlebars is available on its own as a spare part? |
|
 | |
Waspie
Silver Wing Guru


Number of posts : 2392
Age : 72
Location : Portland, UK
Points : 7931
Registration date : 2009-07-26
| | Subject: Re: Plug - Body Part Tue Mar 16, 2010 4:22 pm | |
| Don't know if these guys can help Mike.
http://www.davidsilverspares.co.uk/ |
|
| | |
MikeO
Site Admin
Number of posts : 3788
Age : 74
Location : Seaham, Co Durham, UK
Points : 9440
Registration date : 2009-06-29
| | Subject: Re: Plug - Body Part Tue Mar 16, 2010 4:33 pm | |
| Thanks, Doug. I'll have a search there. It occurs to me that Dennis (may the sun shine on his workshop) might be able to fabricate a metal one, enabling riders to fix a small eye-bolt therein, rather like the curry-hook on the X9.  |
|
| | |
DennisB
Silver Wing Guru
Number of posts : 2778
Age : 73
Location : NE Oklahoma
Points : 8881
Registration date : 2008-12-28
| | Subject: Re: Plug - Body Part Tue Mar 16, 2010 4:48 pm | |
| Hi Guys, Lord knows I've looked at that plug. Poped it out, meaured it, looked at it's mechanics, and the reason it's there. I just covered mine with a handy quick storage leather glove box. 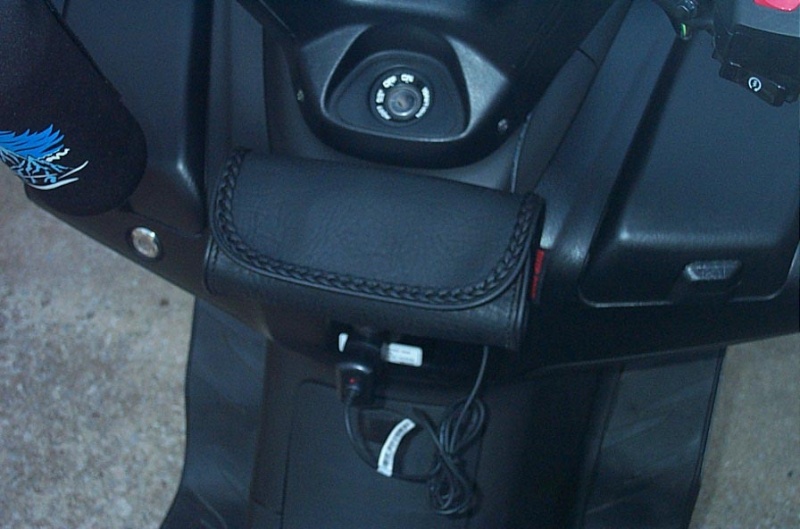 |
|
| | |
MikeO
Site Admin
Number of posts : 3788
Age : 74
Location : Seaham, Co Durham, UK
Points : 9440
Registration date : 2009-06-29
| | Subject: Re: Plug - Body Part Tue Mar 16, 2010 4:57 pm | |
| That's neat, Dennis.
What's the bag hung on?
And what's the hole for that it's covering? |
|
| | |
DennisB
Silver Wing Guru
Number of posts : 2778
Age : 73
Location : NE Oklahoma
Points : 8881
Registration date : 2008-12-28
| | Subject: Re: Plug - Body Part Tue Mar 16, 2010 5:14 pm | |
| Hi Mike, The plug hole....and this is my best guess is, for adjusting the stering neck bearing free play. I installed the glove bag with 2 (stainless steel) screws and 2 S.S. Finder Washers. Center on the plug and 2.0" or 50mm each side of the plugs center. 4.0 inches between the screws. Did this Mod over a year ago, now it's part of the Scooter and would not want it any other way.   Nice place to put cell phone and other small things. |
|
| | |
jdeereanton
Silver Wing Guru

Number of posts : 1995
Age : 76
Location : Huntsville, AL
Points : 7665
Registration date : 2008-12-24
| | Subject: Re: Plug - Body Part Tue Mar 16, 2010 5:43 pm | |
| Page 2-24 of the Honda Parts Catalog for the 2006 model year (also Delta Blue in US)
Item 11
Cap, Switch
64367-MCT-000
It is held in place by friction, but I don't see why an expansion wing (something like a toggle bolt) wouldn't work behind the plug.
http://www.fastenersuperstore.com/partNumber/282813/TBCM/Anchors/1%7C8-X-2-Toggle-Bolts-Combo-Drive-Mushroom-Head-Steel-Zinc |
|
| | |
MikeO
Site Admin
Number of posts : 3788
Age : 74
Location : Seaham, Co Durham, UK
Points : 9440
Registration date : 2009-06-29
| | Subject: Re: Plug - Body Part Tue Mar 16, 2010 5:55 pm | |
| Thanks, gents.
I had thought about installing a couple of Bungee Buddies* by the lids (just where the top corners of Dennis's bag are) but the mechanic at my dealers suggested the plastic was not strong enough.
Presumably, the plug is more cosmetic than necessary.
* http://www.cyclegadgets.com/products/product.asp?Item=BBUD
I have several!
Further to that - how difficult is it to remove the Left-hand cubby? I can manage the Right-hand one. |
|
| | |
DennisB
Silver Wing Guru
Number of posts : 2778
Age : 73
Location : NE Oklahoma
Points : 8881
Registration date : 2008-12-28
| | Subject: Re: Plug - Body Part Tue Mar 16, 2010 6:31 pm | |
| I just wonder what type of switch was meant to be installed in that hole and for what use. Or do you think Honda just didn't have a better name for it. Or is it used on another bike and the name is a hold over. |
|
| | |
Cosmic_Jumper
Site Admin

Number of posts : 4416
Age : 81
Location : damn near Philadelphia, PA
Points : 10531
Registration date : 2009-06-12
| | Subject: Re: Plug - Body Part Tue Mar 16, 2010 11:11 pm | |
| Mike
The part number for that plug is: 64367-MCT-000
As far as removing the left side cubby, you've gotta remove the windscreen & garnish, then the entire front fairing as well as the "meter panel". After those major body pieces are removed you'll need a very long phillips-head screwdriver (with a magnetic head if possible) to remove a very remote screw (1 of 4) holding the cubby to the "inner cover / floor upper cover".
Tim |
|
| | |
MikeO
Site Admin
Number of posts : 3788
Age : 74
Location : Seaham, Co Durham, UK
Points : 9440
Registration date : 2009-06-29
| | Subject: Re: Plug - Body Part Wed Mar 17, 2010 4:03 am | |
| Thanks, Tim. I think I shall have to go to Plan B but I shall Save your instructions for the future.  |
|
| | |
jdeereanton
Silver Wing Guru
Number of posts : 1995
Age : 76
Location : Huntsville, AL
Points : 7665
Registration date : 2008-12-24
| | Subject: Re: Plug - Body Part Wed Mar 17, 2010 5:14 am | |
| I think the plastic may indeed be too thin, but you could fabricate some "doubler" material and using adhesives affix it to the back of the surface. You may not gain alot of additional load bearing capacity, but if you aren't hanging a weeks worth of groceries the bungee buddy affixed to the dash should handle as much as 5 lbs. |
|
| | |
KurtPerthWA
Silver Wing Guru

Number of posts : 1709
Age : 75
Location : Belmont, Perth WA
Points : 7939
Registration date : 2009-01-19
| | Subject: Re: Plug - Body Part Wed Mar 17, 2010 6:59 am | |
| Here's my setup, it the switch with LED that I used for the side stand overide.  Fits like a glove, hey |
|
| | |
MikeO
Site Admin
Number of posts : 3788
Age : 74
Location : Seaham, Co Durham, UK
Points : 9440
Registration date : 2009-06-29
| | Subject: Re: Plug - Body Part Wed Mar 17, 2010 8:43 am | |
| Thanks, Dale.
I guess it is a bit thin although I'd considered a spreader-plate underneath.
My aim is to hang a tunnel-bag on it - not much weight involved.
My old Oxford one is too big for the space so I've ordered a Cortech Super Mini Tank Bag (my partner has one for his BMW so I know it's right for me) which will both hang on the hook or whatever and rest on the tunnel.
In truth, the hook part is to stop it flying off.
When I first put the Oxford bag on the X9 I used the Velcro fastening supplied. Whilst riding at speed soon after I realised the Velcro had not remained stuck to the tunnel so the bag was just resting in place, nestling between my legs!
Thereafter I just hung the bag by its carrying-handle on the curry-hook which seemed to be more than adequate 30,000 miles later.
Incidentally, I like the look of the Silverwing Stuff bag but don't want to completely block the step-thru space - if I do it right, the Cortech bag will swing to one side when I want to dismount or get petrol.
Last edited by MikeO on Tue Mar 23, 2010 10:40 am; edited 1 time in total |
|
| | |
jdeereanton
Silver Wing Guru
Number of posts : 1995
Age : 76
Location : Huntsville, AL
Points : 7665
Registration date : 2008-12-24
| | Subject: Re: Plug - Body Part Wed Mar 17, 2010 9:18 am | |
| Mike,
I do think that the way you describe your planned use, the majority of the weight will indeed not be supported by the hook. I like the SilverWing Stuff bag too, but like you I do not want the (albeit Minor) hassle of moving the bag out of the way to fuel the bike. We had them on our Reflex (i, es, s) and while they were handy I didn't like using them. We only used them on long trips and didn't feel the need to get them for the SilverWings. I'd consider what Dennis has done or what you are describing. |
|
| | |
Cosmic_Jumper
Site Admin
Number of posts : 4416
Age : 81
Location : damn near Philadelphia, PA
Points : 10531
Registration date : 2009-06-12
| | Subject: Re: Plug - Body Part Wed Mar 17, 2010 11:21 am | |
| Mike
Check out the Givi site. IIRC their Tunnel Bag mounts in
the same location. I'm not sure if they use some type of clip, or
velcro.
******************
Kurt
Is your side stand override switch mounted to the OEM plug, but the plug is put in backward?
Nice job mounting those other switches. Did you have to make oval holes to mount them? What are they used for?
Tim
'03 Silverwing, Cosmic Jumper
Philadelphia |
|
| | |
MikeO
Site Admin
Number of posts : 3788
Age : 74
Location : Seaham, Co Durham, UK
Points : 9440
Registration date : 2009-06-29
| | Subject: Re: Plug - Body Part Wed Mar 17, 2010 12:06 pm | |
| Thanks, Kurt. I'm not sure of the front mounting on the Givi bag but the back uses webbing and plastic buckles which require a strap. The sticky Velcro is a farce on the Oxford bag. I had a long correspondence with the man at Oxfords who swore blind he'd made it stick on the X9 tunnel. I contacted 3M who make it and their man said (off the record) that the glue they used would never in a million years stick to the plastic! I have had yet another thought about my mount: I have thought I would use a webbing strop fixed (somehow) in the hole left by the plug. So......what does anyone think about my drilling a small hole on the inner sides of the hole, sliding in a piece of something - either ally tube or a bit of the fibreglass whip aerial I just happen to have (already butchered to make short flag-poles), drilling a hole towards each end and fastening it with split pins. The strop will loop round it and have a plastic hook or buckle (both of which I have) dangling down on the other end to which I can attach the bag (which comes with a plastic buckle on the right end and to which I can add a D-ring.....yes, I've got one the correct size  ). If I'm boring you just tell me to stop and I will!  |
|
| | |
honda_silver
Silver Wing Guru

Number of posts : 2453
Location : Georgetown, Tx
Points : 8155
Registration date : 2008-12-23
| | Subject: Re: Plug - Body Part Wed Mar 17, 2010 12:43 pm | |
| - MikeO wrote:
- The sticky Velcro is a farce on the Oxford bag.
I had a long correspondence with the man at Oxfords who swore blind he'd made it stick on the X9 tunnel.
I contacted 3M who make it and their man said (off the record) that the glue they used would never in a million years stick to the plastic! If you use a strong something like JB Weld (epoxy) between the velcro and the Oxford bag ... it should work. I was able to even stick JB Weld to a mirror. |
|
| | |
Cosmic_Jumper
Site Admin
Number of posts : 4416
Age : 81
Location : damn near Philadelphia, PA
Points : 10531
Registration date : 2009-06-12
| | Subject: Re: Plug - Body Part Wed Mar 17, 2010 10:25 pm | |
| - MikeO wrote:
I have thought I would use a webbing strop fixed (somehow) in the hole left by the plug.
So......what does anyone think about my drilling a small hole on the inner sides of the hole, sliding in a piece of something - either ally tube or a bit of the fibreglass whip aerial I just happen to have (already butchered to make short flag-poles), drilling a hole towards each end and fastening it with split pins. The strop will loop round it and have a plastic hook or buckle (both of which I have) dangling down on the other end to which I can attach the bag (which comes with a plastic buckle on the right end and to which I can add a D-ring.....yes, I've got one the correct size Mike I think that it will be a classier looking installation with a Bungee Buddy in that plug location. Tim |
|
| | |
KurtPerthWA
Silver Wing Guru
Number of posts : 1709
Age : 75
Location : Belmont, Perth WA
Points : 7939
Registration date : 2009-01-19
| | Subject: Re: Plug - Body Part Thu Mar 18, 2010 9:03 am | |
| Att Tim,
re "Is your side stand override switch mounted to the OEM plug, but the plug is put in backward?
Nice job mounting those other switches. Did you have to make oval holes to mount them? What are they used for?"
I'm not sure what you mean re plug, but I did wire into the 2 wires on the Side Stand OEM switch side of the plug. I then ran 2 wires back up to the overide switch. With the switch in the down position(stand down) it lights up so I can see it is activated. A separate circuit is used to power the LED
The other switches required a STD size round hole (13mm/1/2")
From left to right,
1/ Fan overide, RED, The LED also lights up when the fan is on via the thermo switch. so I can see when it is on as well.
2/ Rear view camera/monitor. Yellow. Still having a wiring problem (low volts... waiting till next time the tupperware comes off)
3/ Not wired, Green, probably will be used for Aux lighting.
4/ Radio system RED. |
|
| | |
Cosmic_Jumper
Site Admin
Number of posts : 4416
Age : 81
Location : damn near Philadelphia, PA
Points : 10531
Registration date : 2009-06-12
| | Subject: Re: Plug - Body Part Thu Mar 18, 2010 10:01 pm | |
| - KurtPerthWA wrote:
- Here's my setup, it the switch with LED that I used for the side stand overide.
Fits like a glove, hey Kurt I was referring to the thing below the ignition switch and the 4 aux switches.Is that a switch mounted in place of the body plug? It appears to be a switch that is mounted inside the body line. It kinda looks as if the body plug that would normally fill that location has been put in backward and then a switch (or something) mounted to the body plug. Tim |
|
| | |
KurtPerthWA
Silver Wing Guru
Number of posts : 1709
Age : 75
Location : Belmont, Perth WA
Points : 7939
Registration date : 2009-01-19
| | Subject: Re: Plug - Body Part Fri Mar 19, 2010 3:48 am | |
| No actually its an off the shelf square switch, I filed it back on one edge to fit the indent. Your suggested method may work well too |
|
| | |
MikeO
Site Admin
Number of posts : 3788
Age : 74
Location : Seaham, Co Durham, UK
Points : 9440
Registration date : 2009-06-29
| | Subject: Re: Plug - Body Part Fri Mar 19, 2010 3:51 am | |
| Does the bit of plastic shroud with the plug/switch in come off easily? I can't see any screws and I've almost completely lost my nerve when it comes to taking off panels for the first time. |
|
| | |
jdeereanton
Silver Wing Guru
Number of posts : 1995
Age : 76
Location : Huntsville, AL
Points : 7665
Registration date : 2008-12-24
| | Subject: Re: Plug - Body Part Fri Mar 19, 2010 5:21 am | |
| MikeO,
Seems like I remember it is a friction mount. There are very small clutches, but they won't break as you "pry" the thing loose. |
|
| | |
MikeO
Site Admin
Number of posts : 3788
Age : 74
Location : Seaham, Co Durham, UK
Points : 9440
Registration date : 2009-06-29
| | Subject: Re: Plug - Body Part Fri Mar 19, 2010 5:28 am | |
| Thanks, Dale.
I'm very grateful for all the help, suggestions and patience from everyone - it's a good place to be. |
|
| | |
DennisB
Silver Wing Guru
Number of posts : 2778
Age : 73
Location : NE Oklahoma
Points : 8881
Registration date : 2008-12-28
| | Subject: Re: Plug - Body Part Fri Mar 19, 2010 9:10 am | |
| Hi Mike,
If you would like, you can remove your right glove box and reach in and just push the little plug out with your finger. |
|
| | |
MikeO
Site Admin
Number of posts : 3788
Age : 74
Location : Seaham, Co Durham, UK
Points : 9440
Registration date : 2009-06-29
| | Subject: Re: Plug - Body Part Fri Mar 19, 2010 9:13 am | |
| Ah! Didn't make myself clear enough.  I meant to refer to the whole panel in which the plug is, the panel which is under the steering column. |
|
| | |
DennisB
Silver Wing Guru
Number of posts : 2778
Age : 73
Location : NE Oklahoma
Points : 8881
Registration date : 2008-12-28
| | Subject: Re: Plug - Body Part Fri Mar 19, 2010 9:30 am | |
| Silly Me....I really should try to keep up, but the topic is "Plug - Body Part".
I have replaced that center panel before on my scooter and it is a pain. You need to take the front of the scooter apart to take out the left glove box. |
|
| | |
MikeO
Site Admin
Number of posts : 3788
Age : 74
Location : Seaham, Co Durham, UK
Points : 9440
Registration date : 2009-06-29
| | Subject: Re: Plug - Body Part Fri Mar 19, 2010 9:54 am | |
| Thanks, Dennis. |
|
| | |
MikeO
Site Admin
Number of posts : 3788
Age : 74
Location : Seaham, Co Durham, UK
Points : 9440
Registration date : 2009-06-29
| | Subject: Re: Plug - Body Part Mon Mar 22, 2010 12:41 pm | |
| Job jobbed! The bag arrived this morning - Cortech Super Mini Tank Bag in black (not the magnetic one). http://www.tourmaster.com/xcart/product.php?productid=142 Having pondered the mounting for some time with not a little help from here, I came up with the following solution: Two lengths of ½" diameter aluminium tube - 2" and just under 1" One length of 1" wide black webbing Three 3mm pop-rivets with washers Plastic buckle (comes with the bag) The method isn't exactly as I write it but it's easier to explain this way: I placed the two lengths of tube side by side - if you look at them end on they look like a figure 8. Using one rivet, I attached the end of the webbing to the shorter piece of tube, wrapped it under the longer piece and rivetted it again so the longer tube was trapped in place. I then put a rivet through the webbing into the longer piece so it can't slip out. Then I threaded the other end of the webbing through the hole left after I'd removed the plug from behind the hole (having removed the LH cubby). The webbing comes over the top of the top/shorter piece of tube so there's no direct pull on the closest rivet. The shorter piece of tube is in the recess where the plug sits and the longer piece pulls up against the sides of the hole. I then slipped the male end of a plastic buckle on to the webbing - the strap cannot now fall back through the hole - and triumphantly clipped the bag into place! The female bit is already attached to the end of the bag. I've threaded the webbing through the buckle a couple of extra times so it's fixed, non-adjustable and unable to wriggle itself off. I've heat-sealed the two ends of webbing to prevent them from fraying. Because the webbing is marginally wider then the hole, it didn't fall out when I was fiddling with the buckle so it's not going to rattle about if I'm not using the bag. The bag itself rests on the tunnel so most of the weight won't be on the webbing, just located by it. The bag swings to the side so I can get at the petrol flap and there's a gap between bag and seat sufficient for me to have a bit of step-thru left. Thanks again for all the help and suggestions. I'm really pleased as well because I can quickly restore the bike to 'normal', having altered nothing and drilled no holes. 
Last edited by MikeO on Sat Mar 27, 2010 12:06 pm; edited 3 times in total |
|
| | |
MikeO
Site Admin
Number of posts : 3788
Age : 74
Location : Seaham, Co Durham, UK
Points : 9440
Registration date : 2009-06-29
| | Subject: Re: Plug - Body Part Fri Mar 26, 2010 8:59 am | |
| Happy to report that the mount and bag exceed expectations. We popped into Holland for lunch yesterday - 35 minutes ride there and 90 back via the coast - and the bag hung motionless the whole time. We had quite heavy rain and strong wind for the last half-hour and still the bag neither moved nor got wet. I've used the two remaining buckles in the harness and a length of webbing to make a detachable shoulder-strap, enabling me to carry the bag over my shoulder when I shouldn't leave it on the bike. I'm a very happy, self-satisfied bunny!  |
|
| | |
KurtPerthWA
Silver Wing Guru
Number of posts : 1709
Age : 75
Location : Belmont, Perth WA
Points : 7939
Registration date : 2009-01-19
| | Subject: Re: Plug - Body Part Fri Mar 26, 2010 9:22 am | |
| |
|
| | |
MikeO
Site Admin
Number of posts : 3788
Age : 74
Location : Seaham, Co Durham, UK
Points : 9440
Registration date : 2009-06-29
| | Subject: Re: Plug - Body Part Fri Mar 26, 2010 11:29 am | |
| I'll take a couple tomorrow of the bag on the bike, the shoulder strap and mock up a few of the 'manufacturing process' of the hook. |
|
| | |
MikeO
Site Admin
Number of posts : 3788
Age : 74
Location : Seaham, Co Durham, UK
Points : 9440
Registration date : 2009-06-29
| | Subject: Re: Plug - Body Part Sat Mar 27, 2010 8:29 am | |
| Sixteen pictures downloaded.
The first two are mis-labelled 'Picture 1 & 2'; should be
'Scooter-Bag Hook 1 & 2'
Picture 1 includes the two bits of wooden dowel cut to length I used to demonstrate the method. They are ¾" in diameter.
The aluminium tube in the picture is ½" in diameter.
The cigarette lighter was use to seal the ends of the webbing.
The Savlon was to soothe my wrist, grazed on the edge of the hole where the left-hand cubby resides! |
|
| | |
MikeO
Site Admin
Number of posts : 3788
Age : 74
Location : Seaham, Co Durham, UK
Points : 9440
Registration date : 2009-06-29
| | Subject: Re: Plug - Body Part Wed Mar 31, 2010 11:22 am | |
| Used the shoulder-strap in earnest on Sunday - works a treat. |
|
| | |
MikeO
Site Admin
Number of posts : 3788
Age : 74
Location : Seaham, Co Durham, UK
Points : 9440
Registration date : 2009-06-29
| | Subject: Re: Plug - Body Part Fri Apr 02, 2010 4:14 am | |
| pics??????
Yes, Kurt - they're there - all 16 of them - but no-one's made any comment, good or bad! |
|
| | |
KurtPerthWA
Silver Wing Guru
Number of posts : 1709
Age : 75
Location : Belmont, Perth WA
Points : 7939
Registration date : 2009-01-19
| | Subject: Re: Plug - Body Part Fri Apr 02, 2010 6:57 am | |
| Yeah, all good. I did look the first chance after you posted them. pity it doesn't have a visitor counter on them. I spose all your descriptions made questions redundant. I like the way you can swing the bag out of the way to fuel up. OOOH I didn't mean that pun either! |
|
| | |
MikeO
Site Admin
Number of posts : 3788
Age : 74
Location : Seaham, Co Durham, UK
Points : 9440
Registration date : 2009-06-29
| | Subject: Re: Plug - Body Part Fri Apr 02, 2010 8:05 am | |
| Thanks, Kurt. In fact, I think there is a 'View Count'. I didn't think about the explanation being as comprehensive as that. |
|
| | |
MikeO
Site Admin
Number of posts : 3788
Age : 74
Location : Seaham, Co Durham, UK
Points : 9440
Registration date : 2009-06-29
| | Subject: Re: Plug - Body Part Tue May 04, 2010 7:16 am | |
| A brief update - the hook and bag are proving even better than I'd hoped and have survived a trip to the UK. |
|
| | |
MikeO
Site Admin
Number of posts : 3788
Age : 74
Location : Seaham, Co Durham, UK
Points : 9440
Registration date : 2009-06-29
| | Subject: Re: Plug - Body Part Sat Nov 13, 2010 5:19 am | |
| Pictures - they disappeared from my album at some point:
The first picture shows everything needed for the job.
I used wooden dowel instead of the aluminium tube and drawing-pins for rivets for demonstration.
http://ojznhw.bay.livefilestore.com/y1pbot29_W2rRUjvxmiUNGUSgEqrers_MhFYq0Xt2eJv0HgdHV6agMeU6ER1x-oOvJj-H4q6isGtCB6_2uhcTJElO5sNuVrqSF2/All%20Camera%20Pictures%20624.jpg?psid=1
http://ojznhw.bay.livefilestore.com/y1pKLmneE6J1P8bjF-18egnN0zDLh0Qch5LCLbJA85pjByg5m6Rx6tmpyEeO1VBclfA2JxvIlcNEvEhT45i9IHEeLCeRysrEBI-/All%20Camera%20Pictures%20625.jpg?psid=1
http://ojznhw.bay.livefilestore.com/y1pfpX-2iep5WkphamPQeZ8WvG9icOvioVf6h7hV55cNjn3tQB9mH7SWFbVZgdzdizGMf0m570cqLRgun7KC9XRcpZ_aKdCEs5i/All%20Camera%20Pictures%20626.jpg?psid=1
http://ojznhw.bay.livefilestore.com/y1p0SODeutn0OC-hPZLPHfoRSJ340m4Z76_nmx8jBQx9RP6kmbg8kTsQdZaNbcW-f7TG9C-po1SbEVL2GIGnQ1_Q99OHrjk6jG5/All%20Camera%20Pictures%20627.jpg?psid=1
http://ojznhw.bay.livefilestore.com/y1pWC6FjcXs4Az6ZWLgn7cSsKmRE7zczzNuTxyjKzQoduRwgCnZbZyFTNVQZvvEOZ5xMFf6si_1DOBsJak1RgOFDsbaJVX68x5Y/All%20Camera%20Pictures%20628.jpg?psid=1
http://ojznhw.bay.livefilestore.com/y1pIOyqsh_KDQ8ONnPld3Xz8DwhIfNaYouZotVKEjRtsaK8AWhFxdznwwb11OTGy8wHPUlZ8TBhxcuC1_oL33BrJ-izx-e8YDcp/All%20Camera%20Pictures%20629.jpg?psid=1
http://ojznhw.bay.livefilestore.com/y1puBsoEyEGk1yyXOxrdBGAYJaZycDGPgDXCDPgWHTexJLmUIo8ImUWGlyuFcvQ6AVSYrh99-X8M7xtU9KW9eRO6KAt41BFhpVO/All%20Camera%20Pictures%20630.jpg?psid=1
http://ojznhw.bay.livefilestore.com/y1pHT1QwFE57-hOKhVaoHuDhVlKxnM_N-w5jwRb1EiYmBGzLlbP1sS1v3YqaAKMBbh27N1rnM5oeCWyjqwrrQi1KN8iZFjXXBvH/All%20Camera%20Pictures%20610.jpg?psid=1
http://ojznhw.bay.livefilestore.com/y1pWF08CO32XPq7OR8uh9ubXFT1m6r-e3WOb5gqqC664yQu1lENOZTglBnK89C7fsSTmPINE71acOmE2PaKBR_wNA7V9KkahgMX/All%20Camera%20Pictures%20611.jpg?psid=1
http://ojznhw.bay.livefilestore.com/y1pK3D7ttt72vVZAYGxWe8d4slZUFGMWpPOF7AC8nQ4dA0nbKh9XeAAmHRY6RJ9AMP99_-XwccQWPd6ChbdqyIOieE15d3Ffbxe/All%20Camera%20Pictures%20613.jpg?psid=1
http://ojznhw.bay.livefilestore.com/y1pgcA92AtJuGCsaEbxzl7bl3JuUrIiag97ITxMnoSydV5-1_Ob57JeqkDFSurXjxeRhuC_qTikrMdUbN8CY3_o4Ps0DNxOWn-Y/All%20Camera%20Pictures%20615.jpg?psid=1
http://ojznhw.bay.livefilestore.com/y1paEL7L-lf2BM1eUCHz9mDwTU6GnjOHrhe4rt1HNe3XnLjULBHn7BS-mVYp9mQX6yAf1xhowabMKaMhDFHNBbTQksZNeGI4Ggp/All%20Camera%20Pictures%20617.jpg?psid=1 |
|
| | |
spritwing
Scooter Rider


Number of posts : 19
Age : 61
Location : Hot Springs, Arkansas
Points : 4942
Registration date : 2010-11-06
| | Subject: Re: Plug - Body Part Sat Nov 13, 2010 10:40 am | |
| Very nice MikeO, where did you come across the driver backrest? |
|
| | |
honda_silver
Silver Wing Guru
Number of posts : 2453
Location : Georgetown, Tx
Points : 8155
Registration date : 2008-12-23
| | Subject: Re: Plug - Body Part Sat Nov 13, 2010 2:15 pm | |
| - spritwing wrote:
- Very nice MikeO, where did you come across the driver backrest?
Utopia backrest ( http://www.utpr.com/silverwingnew.html ) ... which makes a huge difference. |
|
| | |
MikeO
Site Admin
Number of posts : 3788
Age : 74
Location : Seaham, Co Durham, UK
Points : 9440
Registration date : 2009-06-29
| | Subject: Re: Plug - Body Part Sat Nov 13, 2010 7:09 pm | |
| Thanks, Bill. It's not cheap but it's the dog's! |
|
| | |
rogerscoot
Scooter Rider
Number of posts : 73
Location : Brinsley, UK
Points : 4932
Registration date : 2011-01-05
| | Subject: Re: Plug - Body Part Wed Feb 16, 2011 6:16 pm | |
| Fixing to plastic......get a packet of screen fixing screws...these come with rubber expanding nuts. Just drill a hole the right size for the nut to slip through; then fix anything, eg D ring, bracket or webbing and clip to the 5mm bolt and fasten it down. Use this to fasten bags, etc to plastic. Try to ensure any pull is at right angles, and not in a direct line trying to pull the nut out. ...just my sixpenny worth |
|
| | |
"Hi Yo"
Silver Wing Guru

Number of posts : 2940
Age : 75
Location : Winnsboro, Texas, U.S.A.
Points : 8341
Registration date : 2010-02-17
| | Subject: Re: Plug - Body Part Sun Jun 02, 2013 12:30 pm | |
| Bump---for those who can't use the search function and me who doesn't know how to post this to Diamond's question. |
|
| | |
Dimond
Silver Wing Expert


Number of posts : 540
Age : 79
Location : San Francisco Bay Area
Points : 5316
Registration date : 2011-08-07
| | Subject: Re: Plug - Body Part Sun Jun 02, 2013 1:22 pm | |
| Thanks for the bump and the 'plug' for using the seach function! |
|
| | |
Sponsored content
| | Subject: Re: Plug - Body Part | |
| |
|
| | |
| | Plug - Body Part | |
|


